Clear video
Click the timestamps in the article below to seek the video. After hitting play you can put the video in Picture-in-Picture mode and watch it right alongside the text.
Spoilers for some of the story in this raid series as well as part of the Endwalker main scenario; I will try to avoid unnecessary spoilers.
Anabaseios

First off, some thoughts on the naming of the tier itself. Lots of notes taken from this great Lodestone post. Prefacing this with saying that I do not know how to speak Greek, only how to search the internet, so apologies in advance for any errors.
The Endwalker raid series is called Pandæmonium, which in Greek is a combination of “all” and “demon.”1 Pandæmonium appears in John Milton’s Paradise Lost as well as Dante’s Divine Comedy, and it is also likely a reference to Final Fantasy II wherein the protagonists enter Pandæmonium as the final dungeon.
Speaking of the Divine Comedy, each of the three tiers of Pandæmonium is a reference to one of the parts in the poem: limbo/Asphodelos/辺獄 (the first act is inferno/地獄 but the first Circle is limbo), purgatory/Abyssos/煉獄, and heaven/Anabaseios/天獄. The Japanese names translate into the names of the three acts in Japanese, while the English version’s Greek names are more referential. Asphodelos is probably a reference to the Asphodel Meadows in the Greek underworld2, Abyssos derives from abyss meaning the world of the dead in Greek3, and Anabaseios is likely derived from Anabasis meaning ascension4, which is also the primary objective of the final boss and fittingly the name for gear received from this tier’s raids. To further cement this connection, the currency used for gear in this final tier is titled comedy/神曲.
Kokytos
The super brief summary of where we are and what’s going on: the facility for monstrosities that we were dealing with in earlier tiers back in ancient times (via time travel) has reappeared in the modern day in what is essentially the afterlife where souls of the deceased return. On our way to investigate we encounter Kokytos, who has been collecting souls for unknown but likely dangerous purposes.
Kokytos (or Cocytus) is one of the rivers surrounding the Greek underworld. In the Divine Comedy it is the lowest circle where souls of traitors are imprisoned. In Anabaseios, Kokytos is a living being, and as can be seen in battle it can consume or absorb collected souls to gain their abilities and personalities.
The song for this fight (and the second fight) is titled “One Amongst the Weary.” The meaning of that title will make more sense in the context of the fourth floor, but one possible meaning is that it refers to you amongst the souls of the dead/weary. You can find an unofficial lyrics video here.
Mechanics
Now onto the fight itself.
This is the first of four fights/floors in Anabaseios. It features two main points of difficulty, which for a first floor is about ideal, although the first major hurdle is punching a bit above its pay grade. It has a couple points that can be a bit tricky, and aesthetically I think it’s a really cool fight and boss concept.
We ended up following the game8 guide as the guides on that site are usually fairly well vetted as well as where most players look to first. Before that, we referenced this Nukemaru video guide, which is what the game8 guide ended up being based on. Feel free to read/watch these first to get an authentic learning experience; the Nukemaru video even has English subtitles!
Ravening
Stylistically the core ability of the boss, but mechanically just a simple raid-wide attack5. Kokytos absorbs the souls of a mage, a martialist, and a beast – specifically a behemoth – as well as a combination of the former two throughout the fight. Each Ravening acts as a phase of the fight, as the abilities the boss uses correspond to the selected archetype.
Duality of Death
This is the first Mage mechanic, a straight-forward double tankbuster6. First tank takes fire damage and increased fire vulnerability, second tank takes wind damage and increased wind vulnerability, so tanks need to swap after the first hit. Pretty standard, but I appreciate the black mage and Dualspell flavor. Speaking of…
Dualspell
The primary Mage mechanic, Kokytos channels two of three spell aspects, each granting an effect to the attack: fire adds AoEs7 on all tanks/healers or dps that must be shared in groups of two (pair stacks), ice adds an AoE in a ring around the arena, and lightning adds line AoEs targeted at all players. Every Dualspell cast is a combination of ice and one of the other two, with the chosen pair indicated by the two spell circles that appear on the boss’s hands. The order of combinations is fixed for almost every usage; for example, the first three are always fire/ice, lightning/ice, then fire/ice. The main point of difficulty is the 50/50 random element: shortly after the Dualcast cast ends, one of the two aspects is flashed on the screen, increasing the size of that portion of the attack.
This is a relatively straightforward mechanic to learn. Aside from the mostly fixed nature of selected Dualspell aspects, each possibility boils down to either in or out and either stack or spread, which are two bread and butters (breads and butters?) of mechanics. Additionally, a feature of most high end encounters, the safe spots for certain attacks are actually telegraphed in the stage itself; in this case, the sizes of normal and enhanced ice attacks matche the circles on the ground. So for example, during fire/ice you stand with your stack partner either inside the inner-most circle if it’s enhanced ice or inside the middle circle if it’s enhanced fire.
For me, my assigned spread position is top-right (marker 1) and my stack partner is directly to the right of the boss (marker B).
| Non-ice Aspect | Enhanced Aspect | Go to |
|---|---|---|
| Fire | Fire | B outer ring |
| Fire | Ice | B inner ring |
| Lightning | Lightning | 1 outer ring |
| Lightning | Ice | 1 inner ring |
Archaic Rockbreaker
The first major mechanic after the boss switches to the Martialist soul, Archaic Rockbreaker is a two sequence attack. First, players are knocked back from the center (or insta-killed if they stand in the purple circle in the middle) followed by pair stacks. In order to not get a ring-out by being knocked into the outer purple ring of death, each pair must position to get caught by the four walls that appeared at either cardinals (north, east, south, west) or inter-cardinals (between cardinals).
Next, the boss starts casting either Front Combination or Back Combination, an orange AoE warning appears in the shape of either a circle under the boss or a ring around it, and cracks of varying lengths appear originating from the middle of the stage. Half the cracks start to slowly fill with lava for a few seconds before exploding while simultaneously the circle or ring AoE goes off. This is followed by an attack covering half the arena either in front or behind the boss depending on what type of Combination it cast earlier. Finally, the remaining cracks go off, and between circle and ring whichever one wasn’t used earlier comes now.
As you can probably imagine, this is a real wall in learning this fight. Let’s break it down.
First off, as you might be able to tell in the video, the time until the initial AoEs go off is quite long; in fact, it’s long enough that you can run all the way to a safe spot on the other side of the boss just fine as long as you use Sprint8. The Front or Back hit comes a good couple of seconds after the initial circle/ring and crack explosions, so you can be in a safe spot on the wrong half of the arena and make it over in time. Furthermore, the cracks appear in one of two patterns, which mirror each other.
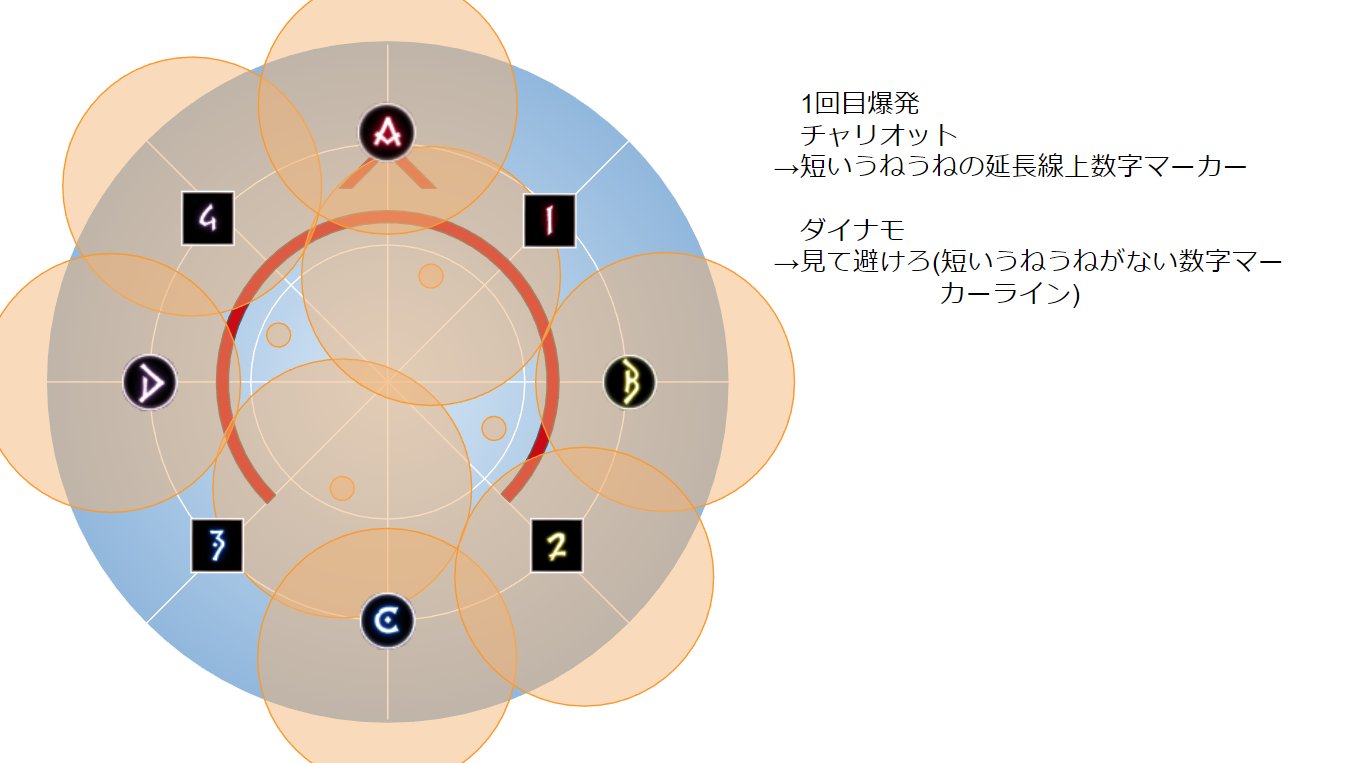
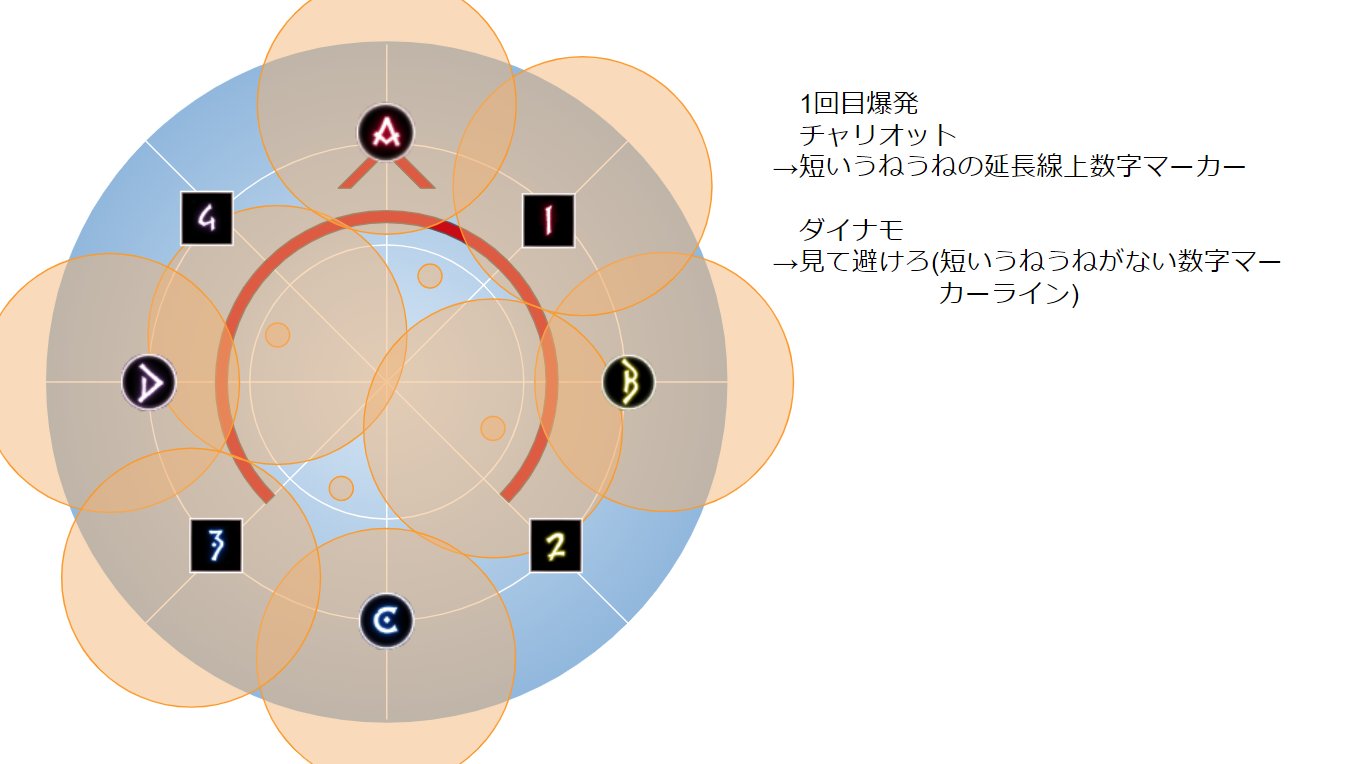
Images source. The image explains that when it’s a circle AoE (chariot) then you should move to a numbered field marker where there are short cracks. On the other hand, if it’s a ring AoE (dynamo)9 then you should go to the numbered field marker where there are no short cracks and shift in, dodging during the split second where the orange warnings appear.
In short, with a couple seconds of leeway in between: go to safe crack spot either out or in, dodge Front/Back, go to other safe crack spot either in or out. With practice, this mechanic is not too bad, but a lot of people struggle to find the correct safe spots, and it’s definitely easier playing a ranged job that can move far away when dodging out without having to stop attacking. It is possible to survive one hit from this with shielding and mitigation, especially the Front or Rear hit, but the recovery from that is tight. The rough part is that the next mechanic targets the two healers with an attack that needs to be shared with at least three but ideally four people each, and if a healer is dead then a random other player is selected, so there’s a solid chance that the party wipes there if the healers didn’t make it through.
Levinstrike Summoning/Scrambled Succession
Also known as Chimeric phase due to combining both the Mage and Martialist souls. A quick aside, Scrambled Succession in Japanese is ジャンブルコンボ which for whatever reason reminded my friends of this video.
First, four walls are formed on cardinals or inter-cardinals like during Archaic Rockbreaker and four lightning orbs are summoned, each in front of a wall. Each orb is given an odd number from 1 to 7 and four players are given an even number from 2 to 8. The orb numbers increase either clockwise or counter-clockwise, and which orb starts at 1 is random. The boss then jumps away, becoming untargetable, and the phase proceeds as follows: first, one of the unnumbered players gets a blue marker over their head. The boss then kicks orb 1 across the arena where it collides with the opposing wall in a small AoE and turns into a tower (another common mechanic component, must be stood in and soaked by at least one player to avoid heavy raid-wide damage), then dashes to player 2 hitting in a moderate sized fire AoE while a clone hits the blue marked unnumbered player in a large ice AoE. Soaking the tower leaves a 6 second increased vulnerability debuff, meaning that player cannot take any damage for the next round of orbs and AoEs. This repeats three more times before the phase finishes.
The sequence of events are fairly straightforward when described in text like this. Additionally, during this entire phase you cannot hit the boss, so you can focus fully on just dealing with the mechanics at hand. However, this is also a bit of a puzzle mechanic; when first encountering this mechanic you need to spend time sitting down thinking about how you want to handle it, and even if you follow a guide there are a few steps you want to make sure to memorize first. With the space provided for that decision making and strategy devising multiple solutions are possible, which can lead to confusion and community fragmentation. Overall, the movement is tight enough that you need to know where you’re supposed to be at any given time or else you’ll get caught in an AoE and might wipe the party.
As of now, there seem to be two popular solutions out there in the JP datacenter, and from what I’ve heard it’s mostly the same in NA and EU. The solution we used is called 無職マラソン式 or jobless marathon. The name comes from how the unnumbered/jobless players start at orb 1 and just keep running clockwise/counter-clockwise. When they are marked for an AoE they stay there until either the phase ends or the numbered player group comes by, at which point they join up together.
On the other side, the numbered players’ movement is a bit more complicated. For the first round, player 6 needs to soak the tower and player 2 takes the fire AoE, then the next round 8 takes the tower and 4 takes the fire AoE, then 2 takes tower and 6 takes fire, then finally 4 takes tower and 8 takes AoE. With this movement, each numbered player does both roles, with a one round gap in between.
This animation is not quite accurate to jobless marathon as the jobless players are in the wrong spots, but the numbered player portion is correct.
I don’t know much about the other primary strategy other than that the movement is apparently focused on a couple specific players, but an animation for that can be found here.
All in all, this mechanic is the hardest point in the fight and can take a while to master. Even if you know the strategy in theory, it’s easy to accidentally move too slowly or in the wrong direction or mix up your job, and depending on your role it might spiral into a wipe, especially if you were supposed to soak a tower. In the clear video, the Gunbreaker actually dies to a kicked lightning orb right before the final round, but since he had already soaked his tower and took his fire AoE he didn’t have any other responsibilities and we were able to continue with no issues. That said, this sequence is immediately followed up by a lightning Dualspell, and if anyone is not alive when it goes off then someone else will get hit twice, so any recovery needs to be quick.
Comet/Ecliptic Meteor
The boss absorbs the Beast soul and casts a bunch of spells here, but the actual movement is simple and requires just a little precision. Charybdis sets up danger zone tornadoes on cardinals or inter-cardinals, Comet drops rocks in the remaining spaces with proximity AoEs10 on impact, and then the boss uses Beastly Bile followed by Thunderbolt. Beastly Bile is a shared AoE targeting a random dps while Thunderbolt is four cone AoEs coming from the boss aimed at the four closest players. The roles are then swapped with tanks/healers taking the Bile and dps baiting the cone AoEs. Both of these attacks leave increased vulnerability debuffs, so each player cannot take the same attack twice.
While this is going on, the comets must also be managed properly. On landing, two of the comets are cracked and two are intact. Bile and Thunderbolt both also damage the comets, causing them to explode after a few moments. At the end of this phase, Kokytos casts Ecliptic Meteor on a random remaining comet, instantly killing any player that does not hide behind another intact comet, meaning the two intact comets must be left untouched until the end. Due to the size of the Bile AoE and tornados, the only safe place to take the Bile hit is on one of the comets. Therefore, the Bile group stands on one of the cracked comets while Thunderbolt baiters position in the gaps between comets. The groups swap, switching to the other cracked comet, and then finally the party shields behind the remaining intact comet.
Archaic Rockbreaker 2
This is essentially an easier version of the first Archaic Rockbreaker, except instead of Front/Back Combination and circle/ring AoE there’s a fire Dualspell at the end. That said, the trickiness of the crack AoEs plus the timing between the second round of cracks and the Dualspell is a bit tight and still has the random Dualspell element of in or out. Additionally, this is now 8 minutes into the fight, so players are likely to be less practiced and more nervous leading to more mistakes.
Chimeric Succession
The final difficult mechanic wherein the boss again utilizes both the Mage and Martialist souls. Like Archaic Rockbreaker 2, this is easier than the first Succession attack but is even further into the fight.
Like in the first Succession, four players are given numbers, but this time they’re from 1 to 4 and always target the players furthest from the boss. The numbered players will be hit by the large ice AoEs from before, which needs to be handled in the north half of the arena. Due to the size of the AoEs, players 1 + 3 and 2 + 4 need to swap positions after the first hit. Meanwhile, the unnumbered players go to the opposite side of the arena, and shortly after the boss casts Front Firestrikes or Back Firestrikes, which is the half-room attack from the first Archaic Rockbreaker; like the first time, the actual hit comes a bit later. The boss then jumps to the main tank with a small shared AoE that decreases in damage the further the target was. Then, the boss casts Swinging Kick, which is the Front or Back hit chosen earlier; since the boss is now facing south, if it was Back Firestrikes then the unnumbered group needs to quickly turn the boss around to prevent the numbered players from getting hit.
 Positions before first numbered AoE
 Movement during the second numbered AoE
Our tank decided to use his invulnerability skill11 and take the shared AoE by himself to make things simpler for the rest of his group. I actually messed up my positioning a bit by standing under the marker rather than as far out as possible, which caused two of the unnumbered players to get hit by my ice AoE. Thankfully this does not lead to any particular issues other than a bit more healing required – the player who died was hit by the Swinging Kick (not my fault!!).
After this the boss repeats some Dualspell casts, a couple tankbusters, and a few raid-wide attacks until he is either defeated like in the video or time runs out, which was probably less than a minute later, and he casts his enrage12.
Conclusion
I think Kokytos is overall a great first floor boss. He is a touch more difficult than usual with Scrambled Succession, but the execution of that mechanic is not actually too tough, and outside of that and Archaic Rockbreaker there isn’t much to worry about. I think the concept plus the production value of the Mage and Martialist voices makes it a cool fight, but the beginning is a bit slow once you’ve done it a few times. Things heat back up during Martialist and of course Scrambled Succession, and the end isn’t very difficult but seeing it frequently leads to much reacting on the fly as you finish things out, which can be fun as well.
There’s an argument to be made that this fight is too difficult, as the first floor is supposed to be where newer players are only lightly challenged, realize Savage isn’t overwhelmingly hard, and feel encouraged to keep going. It’s hard for me to comment on the difficulty level for others, but it definitely seems likely to wall people at Succession Scramble. That said, for one this is the last raid tier in the expansion, so if you didn’t expect to clear quickly, which self-aware newer players should not be expecting, then you have plenty of time to work on it. Additionally, being able to handle that kind of mechanic where you don’t attack and focus solely on movement is an important skill that I think is good to force high-end challengers to develop. Like with everything in this game, if you have the time and patience then nothing is unsurmountable.
https://en.wiktionary.org/wiki/%E1%BC%84%CE%B2%CF%85%CF%83%CF%83%CE%BF%CF%82 ↩
an attack that hits all players regardless of position ↩
a heavy attack that only a tank can survive, typically targeting the player with the most enmity (which should be a tank); a double tankbuster hits both tanks ↩
short for Area of Effect, indicates that multiple players can be caught in the same attack ↩
an ability that increases movement speed for 10 seconds with a 60 second cooldown; usually available for all high movement mechanics but not for multiple in a row ↩
circle and ring AoEs have been a fundamental building block of mechanics since the beginning, and their first appearance in a major high-end fight was on attacks called Chariot and Dynamo ↩
AoEs that decrease in damage the further away you are ↩
all tanks have a skill that makes them invulnerable for a short period, with minor differences per job; in this case, the main tank is a Dark Knight, whose invuln prevents them from going below 1 hp ↩
in all high-end content after a certain amount of time the boss uses an attack that instantly kills the party, which in Savage is usually a bit after the 10 minute mark; occasionally it’s implemented through an overwhelming amount of damage/running out of safe space rather than one insta-kill ability, which is referred to as soft enrage ↩